Pretty much by definition, all simulations have values which change over time. One value that often changes is the position of an object, in which case the object is moving. In this tutorial, we will:
- Give our particles speed and direction (a velocity vector)
- Use basic trigonometry to convert vectors into movement
- Make the particles move randomly
Our simulation is a discrete time simulation, which means that we split time into individual steps. At each step we update the simulation a bit then display the new situation. We keep updating the simulation until the user exits.
To keep our simulation running, we write our code into the infinite while loop that we've already created. The first thing we do therefore is move the following block of code from before the while loop to inside it. This will have no effect on how the program runs but allows us to add additional function calls later.
for particle in my_particles:
    particle.display()
pygame.display.flip()
Representing movement
The simplest way to represent movement is to create two attributes: dx and dy. Then during each pass through the loop, add dx to x and dy to y. So, for example, if a particle has dx=2 and dy=1, it will follow a shallow diagonal, from left to right and top to bottom. This is the method I used for a long time - it is simple and fine for many situations. (EDIT: I have since returned to this method - it is a lot simpler and more efficient. But it's good learn both ways.)
My preferred method now is to create attributes to represent speed and direction (i.e. velocity). This requires a bit more work to start with but makes life a lot easier later one. This method is also good for creating objects that have a constant speed, but varying direction. I actually first started using this method when trying to create an ant simulation. The ants have a creepily realistic movement when given a constant speed and randomly changing their a direction every few seconds.
So let's give our particle object a speed and a direction.
self.speed = 0.01
self.angle = 0
The math module
Since we’re going to use some trigonometry, we need to import Python’s math module. Like the random module, this is part of main Python program so there's no need to download anything extra.
import mathWe now have access to various mathematical functions, such as sine and cosine, which we'll use shortly.
Movement vectors
We now need to add a move() function to our particle object. This function will change the x, y coordinates of the particle based on its speed and the angle of its movement.
The diagram below illustrates how we can calculate the change in x and y. I find it simplest to consider an an angle of 0 to be pointing upwards, despite the fact that y-axis actually pointing downwards in computer graphics.
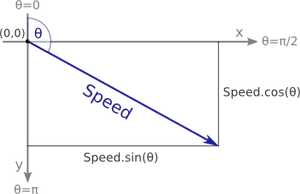
[EDIT: this is not the standard way to do things. In the standard way, you measure an angle from the x-axis, going clockwise, which results in a change of x coordinate of $\text{speed} \cdot cos(\theta)$ and a change in y coordinate of $\text{speed} \cdot sin(\theta)$.]
To calculate the change in x and y, we use some secondary school-level trigonometry as shown in the code below. Remember to minus the y to take into account the downward pointing y-axis. Although it doesn't make much difference at the moment you will have to be consistent with your signs later.
def move(self):
    self.x += math.sin(self.angle) * self.speed
    self.y -= math.cos(self.angle) * self.speed
Another point to bear in mind is that the angles are all in radians. If you’re used to working with degrees then this might be a little confusing; just remember that $1 \text{ radian} = \frac{180^\circ}{\pi}$. Therefore if you want to make the particle move forwards (left to right) along the screen, then its angle should be $\frac{\pi}{2}$ (90°).
So in Python we set the angle to 90° like so:
self.angle = math.pi / 2Now we can we call the particles' move() function during the loop immediately before calling their display() function.
for particle in my_particles:
    particle.move()
    particle.display()
If we run this program now, we’ll see the circles moving right, leaving a smear across the screen. The reason the particles smear is that once Pygame has drawn something on the window it will stay there unless drawn over.
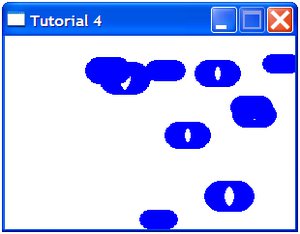
The easiest way to clear the circles from the previous time step is to fill the whole screen with the background colour. We can do this by simply moving the screen.fill(background_colour) command into the loop. The effect of movement is therefore achieved by drawing a particle, then clearing it and drawing a short distance away.
You might have also got a deprecation warning telling you "integer argument expected, got float" followed by the pygame.draw.circle() function. The reason, as you may have guessed, is that this pygame can only draw circles at integer x, y coordinates and after we move the circles, their coordinates become floating point numbers. Although the Python deals with the problem perfectly well, we should convert the x, y coordinates to integers first:
pygame.draw.circle(screen, self.colour, (int(self.x), int(self.y)), self.size, self.thickness)Random movement
If you run this program now, you’ll see all the circles moving rightward at the same speed, so it will look like they are all draw on a single moving surface. We can making things more interesting by giving each particle a random speed and direction. We could do this by defining the speed and angle attributes as random in the Particle class, but I prefer to set these values (the default behaviour) to 0. We can update them once the individual objects have been created, by altering our particle-creating loop:
for n in range(number_of_particles):
    size = random.randint(10, 20)
    x = random.randint(size, width-size)
    y = random.randint(size, height-size)

    particle = Particle((x, y), size)
    particle.speed = random.random()
    particle.angle = random.uniform(0, math.pi*2)

    my_particles.append(particle)
Notice that we use the random.random() function to generate a speed between 0 and 1, and the random.uniform() function to create a random angle between 0 and 2 * pi, which covers all angles. If you run the program now, the circles will fly off the screen at random angles and speeds. In the next tutorial we'll figure out how to keep the particle within the bounds of the window.
Comments (25)
nf3 on 28 Jan 2011, 12:13 p.m.
hi again:
a small error found:
in code snippet about 'Random movement', line 33 lacks the seq parenthesis so:
33 particle = Particle(x, y, size)
should be:
33 particle = Particle((x, y), size)
Peter on 28 Jan 2011, 2:06 p.m.
Thanks, I've changed it. It's nice to know that someone's reading this tutorial.
Joe Nash on 1 Mar 2012, 4:26 p.m.
Iirc, your conversion from degree to radians is the wrong way around. 1 degree = pi/180 radians, and 1 radian = 180/pi degrees. You say that 1 degree = 180/pi radians, which would make 1 degree 57.3 radians.
Peter on 1 Mar 2012, 5:31 p.m.
Thanks Joe, you're absolutely right. I've corrected the text.
colin on 20 Oct 2012, 11:20 a.m.
Hi Peter, I'm a complete beginner with a recently acquired raspberry pi and trying to learn python & pygame. I'm still getting used to the RPi so at the moment I am using a VirtualBoxVM (on a Win XP host) to run a Linux Debian OS with Pygame installed. Your tuts are really great and very easy to follow - so many thanks! I have encountered one issue though on Tut 4, Movement. The code runs fine and does everything it is supposed to with one exception. The console display will only update when my mouse pointer is placed over the console window and moved. In the case of Tut No. 4, the console display initially shows the screen with 10 static circles, then as I move my mouse (without any buttons pressed) over the console window, the circles begin to move. Stop moving the mouse and the circles stop. Its as though the program is somehow linked to detecting a mouse movement and only steps through the move() and display() functions when it detects this. I have tried various forums and google to see if this is a commom problem but nothing found - any ideas?
Peter on 23 Oct 2012, 12:33 a.m.
Hi Colin, I think I've had that issue before. The problem is probably with the indentation. Ensure that screen.fill() and the for particle in my_particles loop are outside of the loop searching for events. Otherwise they will only be called if there is an event, such as the mouse moving over the screen.
Colin on 23 Oct 2012, 11:29 p.m.
Many thanks Peter - perfect diagnosis! I had indeed got the screen.fill and for particle in my_particles indented under the for event loop. Two quick changes to my code and I now have circles floating without the aid of any mouse support. Amazing how obvious things are once they are pointed out (note to self: don't just check you have the same code as the example but check it is in the same place!) With that sorted, I'm off to crack gravity. Thanks again, really enjoying this set of tutorials, are you planning to do any more?
Peter on 24 Oct 2012, noon
I was only able to diagnose the problem because I've had it myself more than once. It is the one problem I have with Python's indentation - confusing bugs can occur when copy-and-pasting sections of code. It's even more of a problem if the code switches from spaces to tabs as then indentation can be wrong even if it looks right.
I'm not sure about making more tutorials in this series. I don't know what else to add. I have a couple of ideas, I might try. I could move it into the third dimension which would require a complete rewrite (something I've started), or maybe add joints to create a sort of skeleton to create stick figures that can move in a fluid way.
Good luck with the rest of the tutorials and beyond.
matt on 1 May 2013, 11:15 a.m.
Hi, for the line particle = Particle((x,y), size)
I get an error telling me name 'Particle' is not defined. Any ideas why this is?
Thanks,matt
Peter on 2 May 2013, 1:57 p.m.
Hi Matt,
It's difficult to say for sure without seeing your code. Do you definitely have the Particle class above that line and it's definitely spelt correct? The only other thing I can think of is that there might be some problem with the indentation somewhere so the Particle class is out of scope.
Fred on 4 Jul 2013, 3:35 p.m.
hey peter thanks for these tutorials! Can you make a tutorial on rotating objects??
Charlse on 16 Jan 2014, 1:59 p.m.
HI, i really enjoy these tutorials. Thanks
I don't think it matters much, but shouldn't the line 22 "self.x += math.sin(self.angle) * self.speed" use cos instead of sin? since sin is o/h and once we mutiply it by the speed(the hyptenuse) it would give as the chage in y, not the change in x. Similarly line 23 should have used sin instead of cos, using the same reasoning.
John on 3 Oct 2014, 1:28 a.m.
Hi,
First of all, thank you for creating this tutorial site. It helps me see python programming in different light. My I.Q has increased by one point.
Anyway, I wanted to share something with you. I improved your code a bit to slow down the screen update. Without the modification, the circles would run off the screen before I had a chance to see what happen. I am using a fast computer with Python 3.3 which is why.
So I added a timer to slow things down a bit.
running = True
clock = pygame.time.Clock() <-- add this
while running:
for event in pygame.event.get():
if event.type == pygame.QUIT:
running = False
screen.fill(background_colour)
for particle in my_particles:
particle.move()
particle.display()
clock.tick(60) <-- add this
pygame.display.flip()
pygame.quit() <-- optional but useful
Don't set the clock.tick( ) more than 60, you won't be able to see what happen. Too fast for your eyes to see. You can set it to 20 for slowness.
Tanuj Rastogi on 23 Jan 2015, 5:43 p.m.
Hi. This is quite an interesting tutorial. I appriciate you making this.
I do have a one small question though: You have measured the angle starting from negative y-axis and running clock-wise. I do find this quite counter-intutive, even though I know its not wrong to do so. Do you have any rationale/reason for choosing this convention? Wouldn't starting from +ve x-axis and running clock-wise be more convinient (as it is sync with regular convention used in cartesian plane).
Sorry if my question feels like a bit of nitpicking, that isn't my intenstion.
Matthew on 10 Feb 2015, 1:29 a.m.
Hi Peter,
Great site. I've been having trouble with the trig for my own programs, and many of the sites I've found are over-complicated or are written for programmers and math majors. Unlike them, I'm not a programmer or a math person but I do enjoy python as a hobby. So far, your site has been much more of a benefit to my undertsanding of python (and trig!) due to it's ease and simplistic examples.
Quick question, though. If you wanted to set the angle of a particle to some non-random number (like have a single particle move towards where the mouse was clicked), how would you accomplish this? I'm not sure I understand how to represent the self.angle using delta x and delta y based on a range of zero to 2*pi.
It's quite easy to find the current position (x, y) of the center of the particle and to find the coords of where a mouse click occurs and then to calculate the tangent of that angle. But how do you translate that into a directional vector and move a particle along a line at that angle?
Thanks, again.
Matthew
Anonymous on 25 Nov 2017, 2:06 p.m.
This tutorial is so perfectly targeted on where I want to be learning right now. At the point at which you say that for a long time you worked with a simple dx and dy variable, but then you graduated beyond that... well, that's where I stand -- I know I need to graduate beyond this. You should know that you made a real, true resource here...
Chris on 27 Jan 2018, 6:01 p.m.
Hi Peter,
Wonderful tutorials! I realize these are a bit old, I hope you still read comments! I am having trouble because at this stage of the tutorial, pygame.draw.circle complains that it expects integer values for x and y, but gets a float. Do you know if pygame has changed in this respect? I have gotten around this by wrapping the expression that updates the x and y values in move function in int(), but I wonder if there is a better way.
Chris on 27 Jan 2018, 6:04 p.m.
Whoops, never mind my last question-- I see you put the int() in the display method. Thanks again!
Sloke on 26 May 2018, 10:50 a.m.
Hello,
I think that it would be better if you mention that 0 radians angle is upward in computers. I learned it the hard way. :p
By the way, Great Tutorial. Thank you very very much for this. :D
John Deighan on 26 May 2019, 10:03 p.m.
Since your Particle constructor is passed a tuple, i.e. pair of values, and a pair of values is needed for the call to pygame.draw.circle(), I was wondering why you stored separate x and y values in the Particle object instead of a tuple. Then when I tried to make my particle move, I realized that the problem is that you can't modify the parts of a tuple. That is easily remedied by using arrays, e.g. [1, 2] rather than tuples, e.g. (1, 2).
Next, I was thinking about your statement that using dx and dy is simpler than managing speed and angle. But I think that this is a real "teachable moment" for information hiding, and also using subclasses. I created a class named MovableObject. When you create one, you pass a position, a direction (in degrees - 0 is up, 90 is to the right) and a speed (which is in pixels per "move") to the constructor. It has 2 methods: move() causes the position (a 2 element array, where the elements can be integers or floats) to be updated, including converting the angle to radians, and a method named position(), which returns a 2 element array and takes care of converting the array elements to integers. It's a 19 line module, including comments, that totally hides all the complexity. The Particle class now is a subclass of MovableObject and no longer needs to be concerned about position and movement. You can now create other types of MovableObject which only need to concern themselves with how to draw themselves (squares, images, stars, etc.) while the subclass handles keeping track of position and movement. When the new thing draws itself, it simply calls the position() method which it inherited to get its position.
Actually, I added 2 additional methods to allow changing the speed and angle, which I'll play with to get the particles to bounce off of the sides of the window. Here is the movable_object.py file:
import math
# --- angle is in degrees. 0 is upward, 90 is to the right
# speed is number of pixels per "move"
to_radians = math.pi / 180
class MovableObject:
def __init__(self, pos, angle, speed):
self.pos = pos
self.angle = angle
self.speed = speed
def position(self):
return [int(self.pos[0]), int(self.pos[1])]
def move(self):
self.pos[0] += math.sin(self.angle * to_radians) * self.speed
self.pos[1] -= math.cos(self.angle * to_radians) * self.speed
def change_angle(self, angle):
self.angle = angle
def change_speed(self, speed):
self.speed = speed
The only changes needed for the Particle class is to make itself a subclass of MovableObject, call the MovableObject constructor, stop storing the position (which is now managed by MovableObject) and call self.position() to get the position to pass to the function that draws the circle.
John Deighan on 26 May 2019, 10:05 p.m.
All my indentation was lost in my comment. Hope you can figure it out.
Shankar on 14 Mar 2020, 11:31 a.m.
Awesome Tutorial!
Loved it.
The only good tutorial about physics from scratch in pygame.
Exe on 1 Apr 2020, 5:43 p.m.
Definitely the greatest tutorial out there about pygame physics. This is a life saver during my computer sciences. Thank you so much!
Joseph on 23 Oct 2020, 2:47 p.m.
Great tutorial, thanks a lot for all the effort!
PyScientist on 8 Nov 2020, 8:25 p.m.
Add acceleration )
def move(self):
"""move particle to to the new location
According its x,y and speed and angle(moving vector)"""
self.speed = self.speed + self.acceleration
self.x += math.sin(self.angle) * (self.speed)
self.y -= math.cos(self.angle) * (self.speed